
I spent way too long trying to get a simple Zigbee sensor working with Tasmota and MQTT using a Sonoff Zigbee Bridge. Initially got it all working in about 10 minutes but then found that it wasn’t quite configured in a way that would work for me (all readings are sent to a single SENSOR topic). I thought it would be simple to configure it to send each sensor reading to its own topic but it took me a while to figure out how to do this. The notes below are for my future self and anyone else who might find them useful.
The Sonoff Zigbee Bridge Pro is an ESP32-based device with a separate Zigbee chip (CC2652P) inside. The default firmware locks this all down to the eWeLink ecosystem. By flashing Tasmota firmware onto the ESP32, you unlock its full potential. Tasmota has a built-in module called Zigbee2Tasmota that acts as the coordinator. It manages the Zigbee network, pairs with your sensors, and then, using Tasmota’s native MQTT capabilities, publishes the sensor data directly to your specified MQTT broker.
The instructions below will hopefully help you get set-up. Build requires:
- Sonoff Zigbee Bridge Pro (+ a sensor to connect to it, I used Sonoff SNZB-02P)
- USB to TTL cable (FT232)
- MQTT broker running (mqtt.cetools.org)

Setting up Sonoff ZB Bridge Pro with tasmota2zigbee
Getting started guide at: Getting Started

Took a few attempts including having to factory reset and start over again but the below is the final process used. I had trouble getting the boot loader mode to work with the web gui so reverted back to using ESPTool - the below assumes that you have esptool installed. This might have been caused by power issues — but never worked out the answer.
Download tasmota32-zbbrdgpro.factory.bin
Downloaded factory.bin file from tasmota site - make sure to use factory.bin file towards the bottom of this page:
https://ota.tasmota.com/tasmota32/release/
This is a special build designed for flashing a device for the very first time. It contains all the necessary components for an out-of-the-box experience.
Flash Tasmota to Bridge
Then cleared memory for fresh install:
python3 -m esptool --port /dev/tty.usbserial-AD0JIOIN erase_flash
Then flashed the factory bin:
python3 -m esptool write_flash 0x0 tasmota32-zbbrdgpro.factory.bin
With the device flashed I then used the FT232 connection to inspect the serial port to see what was happening on the device (initially it wasn’t creating an AP) - turns out there was not enough power from the USB socket I was using causing the board to go into reset loop while trying to connect to wifi. I shifted to a dedicated phone USB supply to fix the problem.
screen /dev/cu.usbserial-AD0JIOIN 115200
Note: closing the terminal window might not terminate the screen session, which could lock the serial port and prevent other applications (like esptool.py) from using it. Always exit screen correctly with the Ctrl+A, K sequence.
Set-up the ZB Bridge Pro GW
Connect to Tasmota Wi-Fi: After flashing, your device will create a Wi-Fi network. Connect to it and go to the web UI at 192.168.4.1.
Configure Wi-Fi: Enter your Wi-Fi credentials to connect the device to your network.
Configure MQTT: Once the device is on your network, go to the Configuration menu, then Configure MQTT.
- Host: mqtt.cetools.org
- Topic: tasmota_6924F8 (This is the base of your desired topic path).
- User/Password: Your credentials for mqtt.cetools.org.
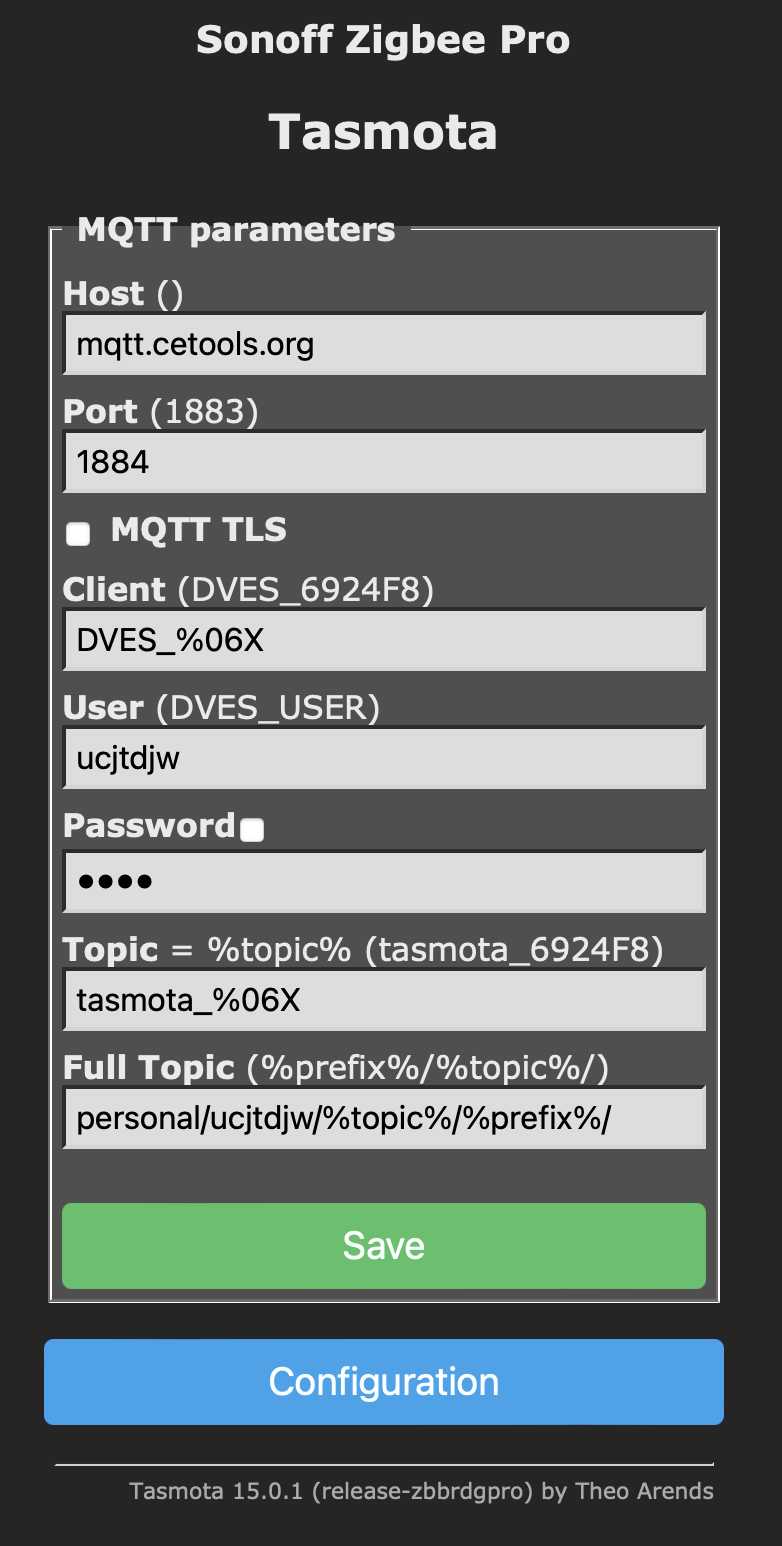
Save: Click “Save” and the device will restart and connect to your MQTT broker.
Note: MQTT info
Flash the Zigbee Coordinator Firmware:
Zigbee The Tasmota firmware image includes the necessary files, but you need to run a special command to flash the internal Zigbee chip. Sonoff Zigbee Bridge Pro ZBBridge-P Zigbee compatibility This is done through the Tasmota web gui
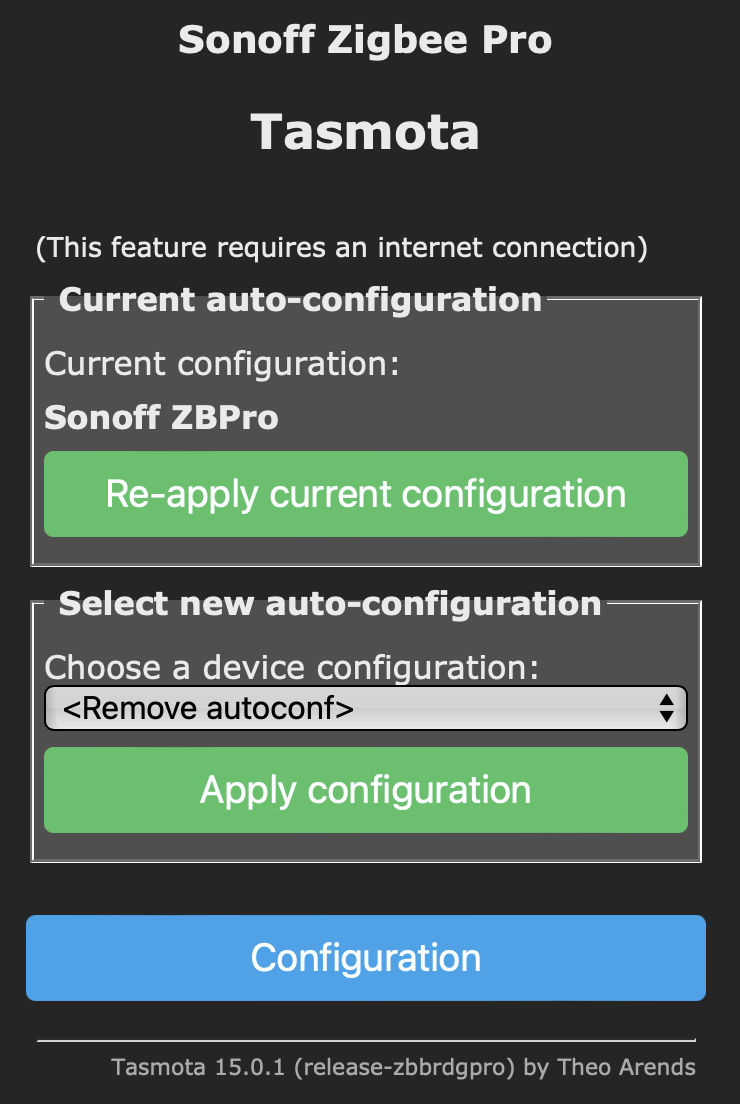
Module Configuration: Go to Configuration > Configure Other > Auto-Configuration.
Select Sonoff ZBridge: From the dropdown menu, select Sonoff ZBridge and click “Activate”. The device will restart and be configured as a Zigbee gateway.
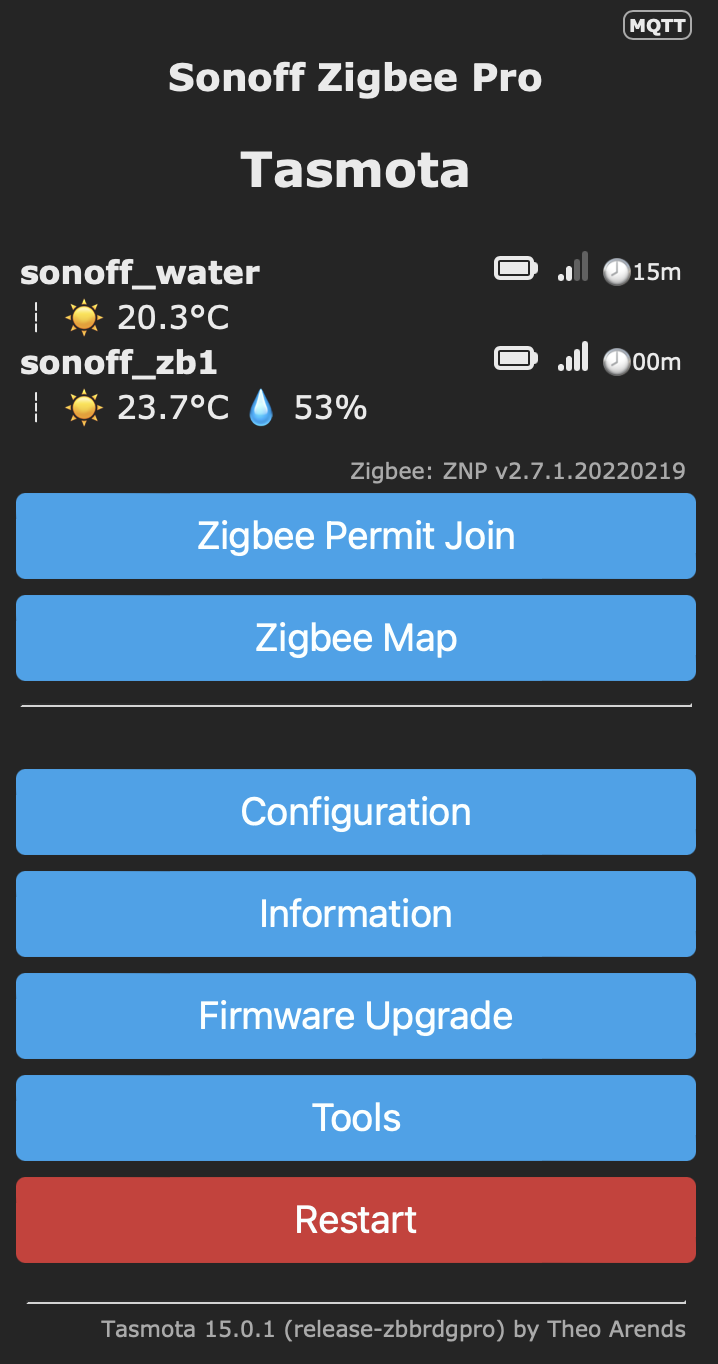
Start Pairing Mode: In the Tasmota web UI, go to the Console. Type ZbPermitJoin 300 and press Enter. This will open the network for joining for 600 sec / 5 mins.
Pair Your Devices
Pair the SNZB-02P: Press and hold the button on the SNZB-02P for 5 seconds until the LED flashes to put it in pairing mode. Tasmota will show a confirmation message in the console.
Pair the SNZB-02LD: Repeat the same process for the SNZB-02LD.
After pairing, in the console, type ZbStatus 1 to see a list of your devices and their assigned short addresses (the SNZB-02P was 0xACFC, SNZB-02LD was 0xC5A6).
Define Friendly Names: Give your devices human-readable names. In the console, type:
ZbName 0xACFC,sonoff_zb1
ZbName 0xC5A6,sonoff_water
The sensors should be discovered by the bridge and a message will appear in the console confirming the new device.
Final Configuration for Separate Topics
This is the most critical step to ensure each sensor reading is published to its own retained topic.
Define the Tasmota Rule: This rule will trigger on the internal ZbReceived event and publish each sensor reading to its own separate, retained topic. Rule format for sending to other mqtt topics - search for publish on these docs
Rule<x> on zbreceived#<zigbee_id>#<zigbee_sensorname> do publish home/zigbee/<zigbee_name>/<sensorname> %value% endon
Rule<x> 1
Note: Use publish2 for retained messages
This is the rule implemented:
Rule1 ON ZbReceived#0xACFC#Humidity DO publish2 personal/ucjtdjw/tasmota_6924F8/sonoff_zb1/Humidity %value% ENDON ON ZbReceived#0xACFC#Temperature DO publish2 personal/ucjtdjw/tasmota_6924F8/sonoff_zb1/Temperature %value% ENDON ON ZbReceived#0xACFC#BatteryPercentage DO publish2 personal/ucjtdjw/tasmota_6924F8/sonoff_zb1/BatteryPercentage %value% ENDON ON ZbReceived#0xC5A6#Temperature DO publish2 personal/ucjtdjw/tasmota_6924F8/sonoff_water/Temperature %value% ENDON ON ZbReceived#0xC5A6#Humidity DO publish2 personal/ucjtdjw/tasmota_6924F8/sonoff_water/Humidity %value% ENDON
(Note: The SNZB-02LD does not report battery percentage, so a rule for it is not needed.)
Activate Rule and Restart:
Rule1 1
Restart 1
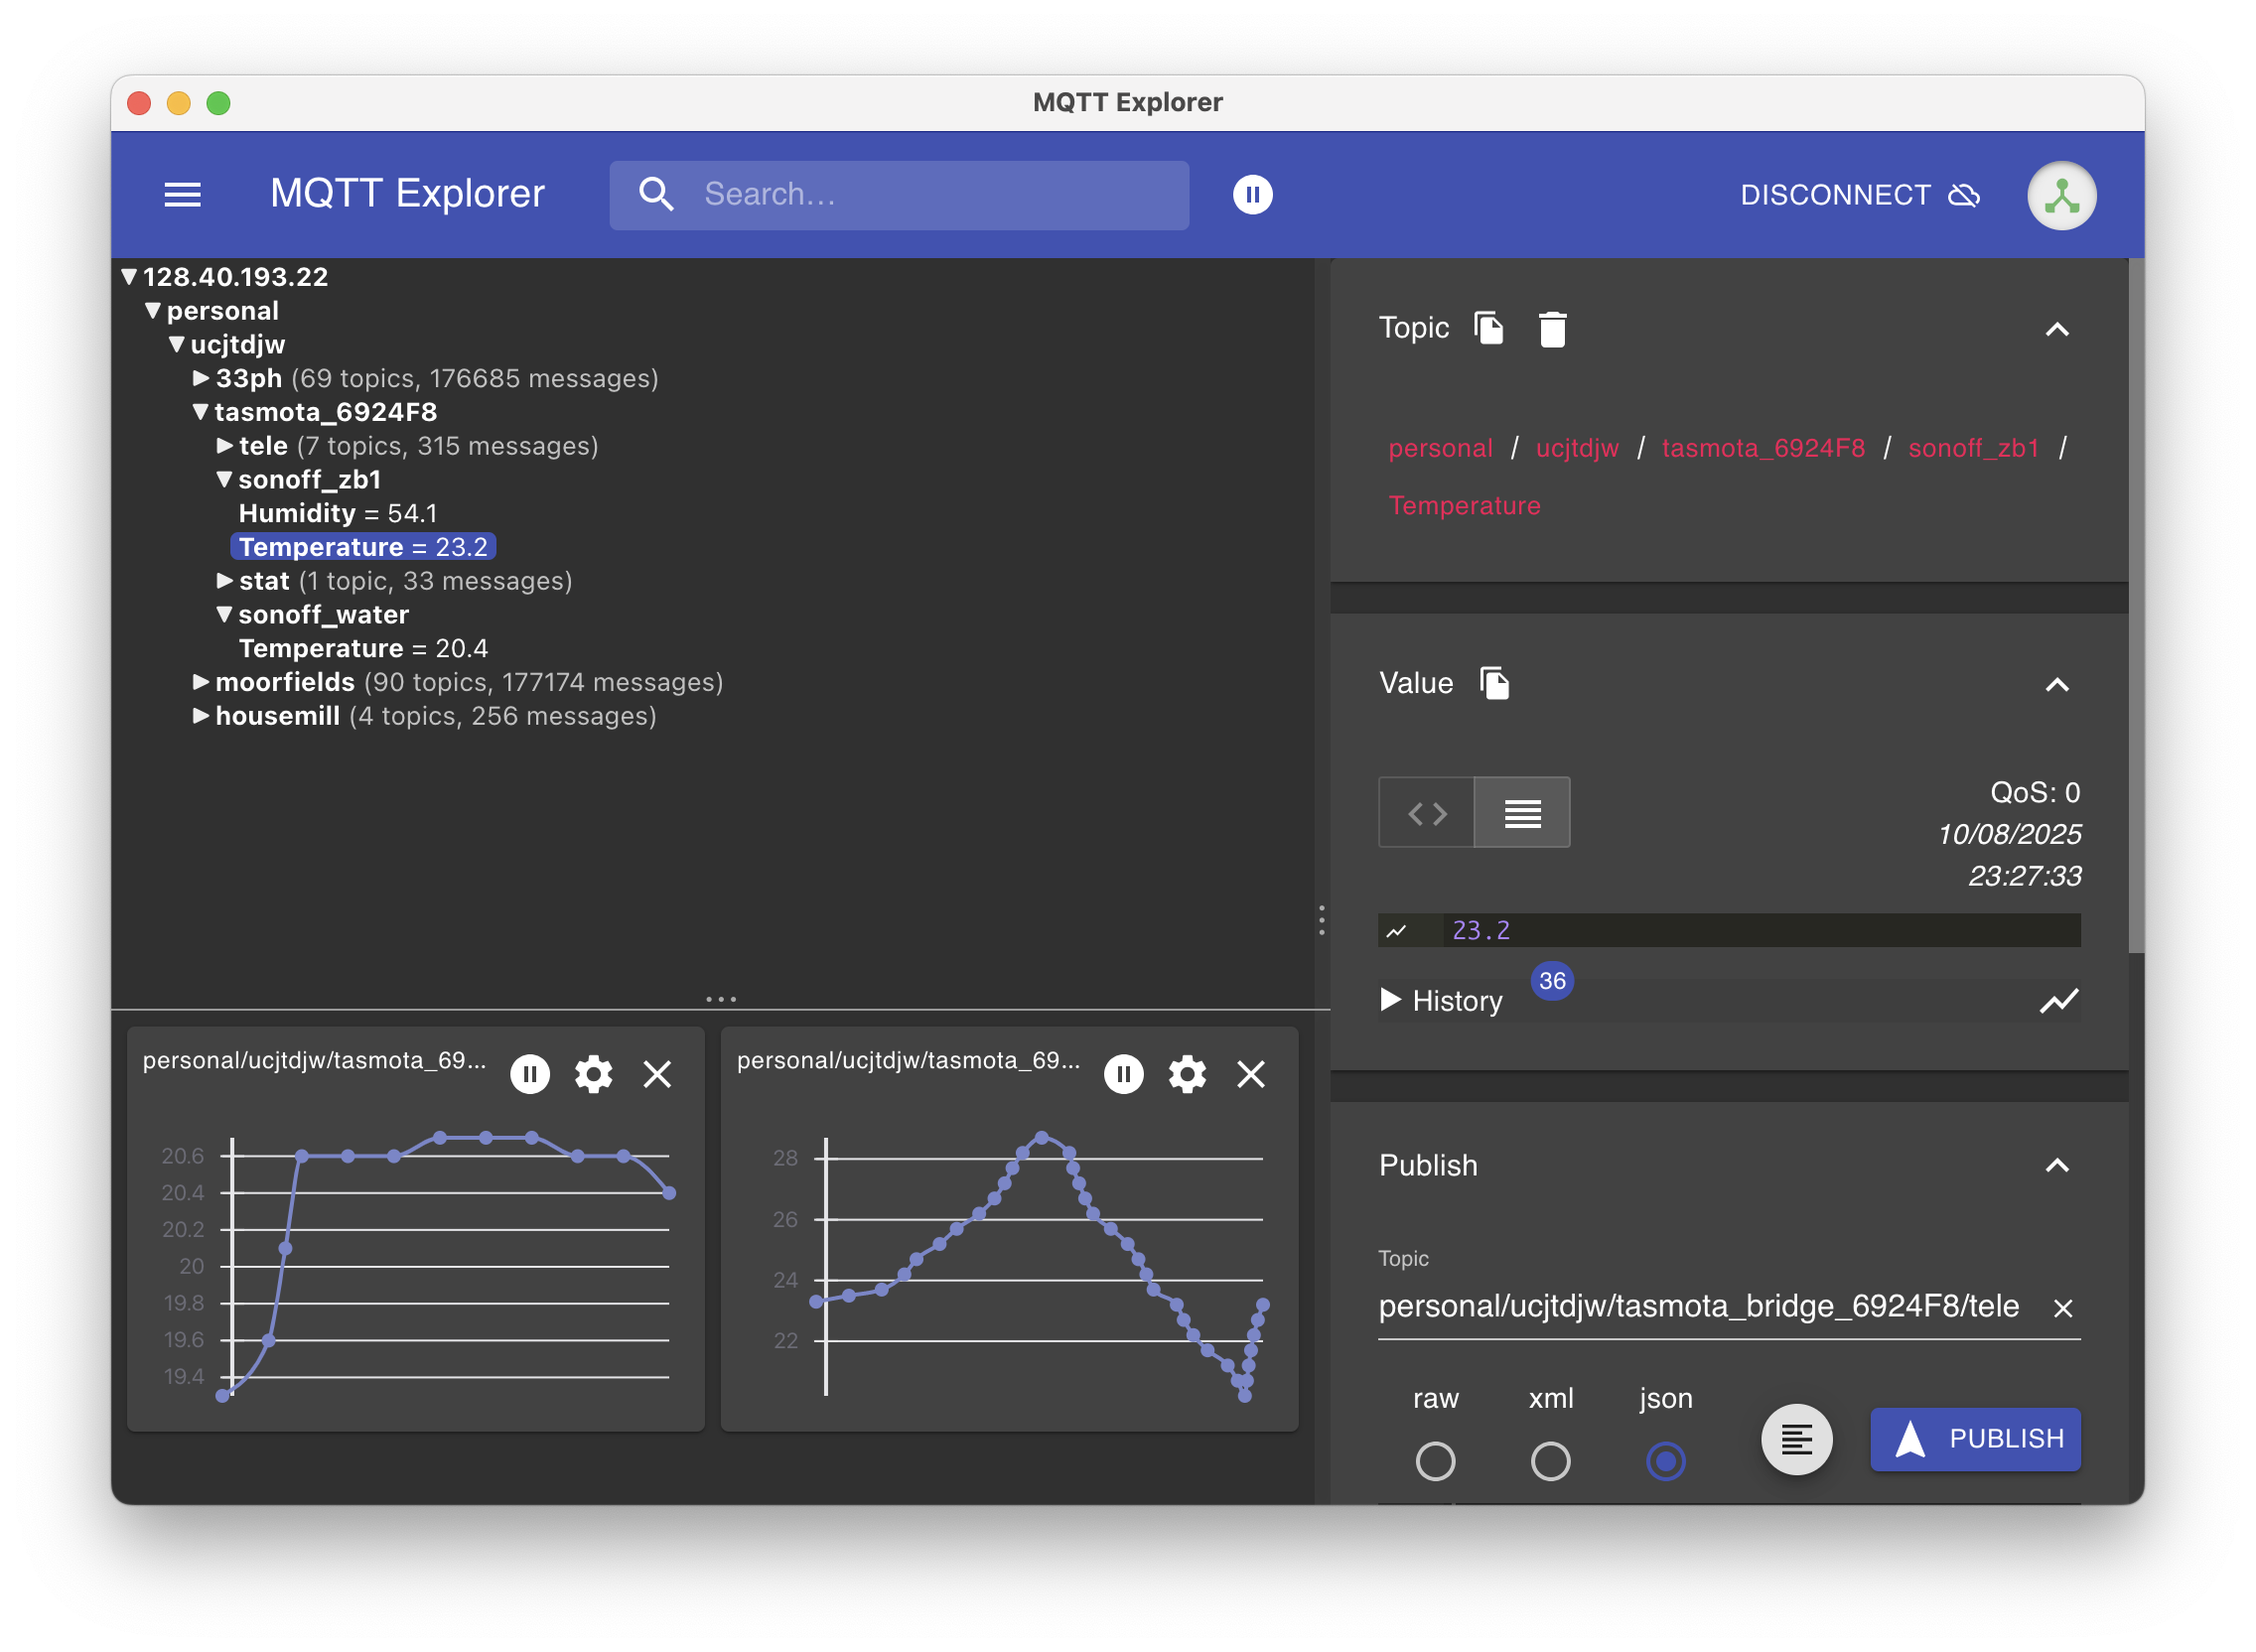
After the restart, your devices will report to the clean, separate, and retained MQTT topics you’ve configured. You can then use MQTT Explorer to confirm that both temperature and humidity messages for each device are being retained simultaneously.
Testing the Setup
The screenshot below shows the MQTT Explorer with the topics and values being published by the sensors.
Additional notes:
Changing reporting interval
Zigbee devices like the SNZB-02LD are designed to be battery-efficient, so they don’t report data constantly. Instead, they operate on a “reporting” mechanism with three key parameters: 1 Minimum Reporting Interval: The shortest time between two reports, even if the value changes. 2 Maximum Reporting Interval: The longest time the device will wait before sending a report, even if the value hasn’t changed. 3 Reportable Change: The minimum change in value (e.g., a 0.5°C change in temperature) that will trigger an immediate report.
Setting 5mins as the shortest report rate, 1 hour as the upper limit, 0.5 degree change:
ZbSend {"Device":"0x7923","Config":{"Temperature":{"MinInterval":300,"MaxInterval":3600,"ReportableChange":0.5}}}
ZbSend {"Device":"0x7923","Config":{"Humidity":{"MinInterval":300,"MaxInterval":3600,"ReportableChange":3}}}
ZbSend {"Device":"0xC5A6","Config":{"Temperature":{"MinInterval":300,"MaxInterval":3600,"ReportableChange":0.5}}}
View Data on your MQTT Broker:
Tasmota will automatically start publishing the sensor data to your mqtt.cetools.org broker.
You can use an MQTT client like MQTT Explorer to subscribe to the topics and see the data flowing in. The topics will follow the structure you defined in the Full Topic setting, and the payload will be a JSON object with the temperature and other sensor data.
Advantages of this Approach:
No Raspberry Pi Required: The Sonoff Zigbee Bridge Pro acts as a standalone device, handling both the Zigbee network and the MQTT communication.
Simple & Clean: Fewer devices to manage, fewer points of failure, and no need to worry about the Raspberry Pi’s operating system, updates, or power.
Reliable: Once configured, it’s a solid, single-purpose device that is less likely to have issues than a more complex multi-component setup.